You know, the best time to start a blog was 10 years ago?
But do you know the second-best time to start a blog?
Today!
Yeah yeah, I know. I conveniently stole a Chinese proverb and made it my own.
Go ahead, sue me.
But you don’t need me to tell you that there is a lot of truth in it.
If there wasn’t any truth, you wouldn’t be reading this.
The truth is that if you want to see any kind of success with blogging in the future, you need to learn how to start a blog today.
Actually, scratch that – you need to start a blog NOW!
“Easier said than done,” you say?
Believe me when I say this, setting up your blog is very simple – but not easy.
I am sure you would agree that nothing worthwhile is easy and nothing easy is worthwhile.
It’s the same with blogging. But you have to start somewhere, right?
How much longer are you going to procrastinate?
How much longer are you going to lie to yourself that someday you are going to start blogging? Because last time I checked, someday is not a day of the week.
Look, I am not trying to offend you here. I am just trying to help you.
Maybe you need that nudge, that tough love to push you to take that leap after all.
I know that because I have been there too. All the while, I only wished for someone who could kick me in the backside and get me to take the leap.
It was worse for me because I have helped set up blogs for so many startups and companies and attracted millions of people every single month.
If I could do that for them, why not for myself?
More often than not, transformations in any aspect of your life require a certain amount of misery, a point where you get so fed up that the pain of not doing something is more intolerable than the overwhelming fear of doing something new.
I finally reached that point, stopped bullshitting myself, and set up my own blog — hands down one of the best decisions I have made in my life.
My blog became my outlet to express my opinions, articulate my thoughts , and share them with others.
It allowed me to influence the hearts and minds of thousands of people every month by educating them and, brick by brick, eradicating their ignorance. Trust me, it’s a very satisfying feeling – blogging is the easiest way to help others.
Now, I want you to feel it too. I want you to take the plunge and finally start your own blog.
I am going to guide you step by step through the entire process so by the time you are done reading this, you will know the path to take to set up your own blog.
(NOTE: It doesn’t matter whether you want to start a travel blog, fashion blog, tech blog, food blog, or a lifestyle blog – the same fundamentals apply)
Buckle up! It’s going to be a wild ride.
What is a blog?
(And why choose WordPress to set up your blog)

A Blog (short for weblog) is a discussion or informational website.
Posts are typically displayed in reverse chronological order so that the most recent post appears first, at the top of the page.
Now, when I say blog, you must be thinking about sites like Wix or Blogger, where you can set up a free blog on a subdomain like this: abcd.wix.com
But I won’t be talking about such free blogs in this blog post.
I will be talking about setting up your own self-hosted WordPress blog on a custom domain name like www.yourdomain.com where you have complete control over how your blog looks and what functionality it has, and more.
But why WordPress, you ask? And why not Wix or Medium or Blogger?
Simply because WordPress is the simplest, most popular way to create your website or blog.
And guess what – it’s absolutely free to use. It’s an open-source content management system with a robust ecosystem of plugins and themes (you will know what they are soon).
In fact, WordPress is so versatile and popular that it powers 40% of the internet! Try to wrap your head around it – 40% of the entire world wide web!
Apart from this, a WordPress blog is extremely user-friendly, easy to customise, versatile, SEO-friendly, safe, and secure.
You might also be wondering whether hosting the blog yourself on a custom domain is overkill.
I don’t think so, and here is why:
A blog is what I call a digital asset. But what is a digital asset anyway?
In the simplest terms, a digital asset is any digital property that you can own, have complete control over, and has an underlying value.
A blog is an excellent example of a digital asset. Through your blog, you can share valuable information and opinions, which can attract an audience’s attention.
And as it stands, attention is the most valuable commodity today.
Now you can convert this attention into a transaction by selling a product or service, thereby making your asset valuable, or rent out this attention in the form of ads and contextual branded content.
Either way, now you have an asset that has the potential to be of immense value.
But that’s not even the best part of a blog. The best part is that the cost of creating a blog is next to nothing.
Compare it to a physical asset like a house, which obviously can have a lot more value and utility, but it also can be very expensive. You need to invest money in land, labour, and raw materials to make it valuable.
But digital assets like blogs don’t need much investment.
You can start a blog with a minimal investment of not more than Rs. 3000 per year, which is a steal considering how much you can make out of it and the opportunities it can open up for you.
Oh, did I mention another really cool thing about setting up a blog?
When you create content and publish it on your blog, you can make it accessible to many people without incurring additional costs.
To help you understand what I mean by this, imagine you were a magazine publisher; if you had to reach about 1000 people, you had to print a thousand copies, costing you extra money to print each additional copy. Obviously, you cannot reach a thousand people with just one copy, at least not simultaneously.
On the other hand, your blog post can serve 1000 people without additional costs. Through a blog, you actually replicate content and make it accessible to multiple people simultaneously without added costs.
More people means more attention, and more attention means more possible transactions while your costs are the same.
In fact, the most important investment of a blog you need (apart from the minimal monetary investment) is time and effort, which I genuinely believe can be invested by everyone.
So, considering that your blog is a digital asset, would you not want to have control over it? If you were to buy a house, would you register your house under someone else’s name? Of course not!
This is why setting up a blog on your custom domain and hosting it yourself makes so much sense.
Having said that, there is one nagging question that I would like to address before we move on:
Is blogging worth it?
Every year this question (or another variation, “is blogging dead?”) pops up in one or the other community on the internet. Honestly, it’s a yearly ritual.
To make my point, allow me to quote the legendary Sahil Lavingia, who happens to be the founder of Gumroad, a website that literally powers creators (yes, including bloggers) here:
The key phrase in this tweet is this:
Distribution channels have shifted, but what gets distributed has not (good ideas that entertain, inspire, educate).
What he means here is that since blogging emerged in the early 2000s, new platforms like YouTube, Instagram, TikTok, Discord and more have emerged. But the need to be entertained, inspired, and educated has also grown exponentially thanks to the increasing internet penetration.
Now, one could argue that it’s much easier to start a YouTube channel (not really but yeah) or an Instagram page or any other platform.
But there is a big problem there.
You see, when you create content on YouTube, Instagram, and platforms like that, you don’t own the audience – you are renting them.
Not to mention the fact that you have zero control over your “assets.” One fine day you might wake up to find your YouTube channel banned or your Instagram account shadowbanned or downright taken down.
But with a blog, you have complete control, and nobody can dictate rules and what you can produce, how you can produce, or anything of that sort. Now, do you understand why I called a blog a digital asset?
Just so I can remind you how powerful a blog can be, let me tell you that you own the audience with a blog. They are your audience, and the dynamics between you and them are decided only by you and them, not gatekeepers.
But with the rising popularity of YouTube and other platforms like Instagram, it’s only natural to feel if people will even bother reading blogs anymore.
They do, but you have to evolve a little bit with the changing landscape by making it more interesting. Lucky for you, WordPress allows you to make your blog posts richer in content. You need to add images, videos, and other multimedia content (this blog post is a good example).
In fact, the easiest thing to do is to repurpose your content and make it available in different formats for your audience; that way, while your blog becomes your central piece to attract the audience, you can also give your audience the ability to choose how to consume your content.
Besides, blogging is writing, and writing is thinking.
With writing, you are taking a vague shapeless concept in your head and converting it into structured information – you are making your thoughts accessible and tangible to your audience.
So, the more you write, the better you can think, and the better you start thinking, the better you start writing.
This is also why I first prefer writing before repurposing it into images and videos. When you write things down, it gives your thoughts and information a structure, making it easier for you to shoot videos or make Instagram posts.
From a reader’s perspective, reading content is very convenient purely because one can scan content to get all the information they need. Compare this to a video where it is difficult to scan through the video without actually watching it. Of course, I am not saying videos or other formats are bad. All I am saying is that the written text offers you certain advantages that other formats don’t.
For all the reasons mentioned above, the short answer to “is blogging worth it?” is a resounding YES!
Now, before you go about setting up your blog, the most important thing that you need to know and consider is the niche you will be operating in.
How to Find Your Niche in Blogging

What is a niche, after all?
A niche market is a submarket of a market.
Usually, this submarket has a unique set of needs and preferences that differentiates it from the market at large. For example, fitness might be the market at large but different people might want to get fit in different ways like yoga, callisthenics, weight training etc.
But why does everyone keep talking about going niche? Why can’t you start blogging about multiple topics in the same blog?
The answer is simple: if everybody is your audience, then nobody is your audience.
Of course, there is more than what meets the eye with that answer.
As counter-intuitive as it might sound, if you try to please everybody, you will end up pleasing nobody.
Think about it, do you really think everybody has the same goals, dreams, challenges, and pains? Do you really believe that an 18-year-old has the same hopes as a 65-year-old does? Then how do you think the same exact content can please both of them or, in other words, EVERYBODY!?
When you go niche, you address a specific set of audiences who have a specific need to be fulfilled. Since you are going after a small pocket of demand from a specific audience set, the competition drastically drops.
If you have played chess, you will know that the first rule of the game is not to lose before you go out there and try to win. It’s the same with blogging – you must first aim to survive before you thrive. Going niche is the easiest way to ensure that.
Now, when you are trying to please a specific set of audiences, then the first criteria of going niche is already satisfied – does your audience need it? Since you are addressing a small pocket of demand, you know there is indeed a demand regardless of the quantum of the demand in question.
The next criteria you need to consider is whether they will pay for whatever they are looking for? Now, you don’t necessarily have to get your audience to pay for it, but this is just to validate the seriousness of the demand in the market.
If the answer is yes, then please make sure you have a genuine interest in the niche you are entering. Why? Because look, blogging is not going to be easy, and it is going to take you a significant amount of time and effort to see any kind of serious results from it. If you don’t have a genuine interest in your niche, it’s going to be extremely difficult for you to stick to it for a considerable amount of time and see exponential results.
This brings me to the next point, which is, are you good at it? This criterion is an extension of the previous one. If you like what you are blogging about, you will eventually become an expert at it, but you don’t have to be an expert to get started with. You have to be at least reasonably good or adept at the topic that you are planning to blog about. Only when you are reasonably good at it, you would be able to add value to your audience.
If you want to read in detail about what a niche is and how to find it, I would recommend reading this blog post: https://sanjayshenoy.com/find-your-niche/
Awesome, now that you have a clear idea of what your niche is, let’s move on to the next step.
Setting up your hosting & registering a domain name for your blog

Time to shift gears and move into technical mode.
I would like to tell you that if you have no idea about the technicalities of setting up a blog, you can still start your blog. Do not get intimidated just because it’s slightly technical.
If it makes you feel any better, let me tell you this: I am not a technical person either.
If I can do it, so can you.
Of course, it looks and feels intimidating now only because you don’t know what you don’t know. Once you get your hands dirty and understand the nuances of these not-so-technical things, you will be a lot more comfortable.
Let’s begin this journey by understanding what hosting is first.
A web host or a server is nothing but a computer where all your website files are hosted. All you are doing when you buy hosting is you’re renting out space on a computer that is connected to the internet.
Now, to access this computer or host server, you need what is called an IP address which looks something like this: 173.194.121.32
It’s a unique numerical address assigned to each computer, exactly like how you need an address to access your house or anybody’s house, for that matter.
But look at those numbers – it looks so robotic and impersonal.
This is why we have what we call domain names which look like this: www.google.com or www.sanjayshenoy.com
In essence, a domain name is a human-readable address of a web server available on the internet where your website is hosted.
You might be wondering, when you type in a domain name in your favourite browser, how does it know which server to contact? This is where something called Nameservers come into the picture.
Nameservers help connect domain names with the IP address of web servers.
Remember when somebody gives you their phone number, what do you do? You save the phone number under a particular name, and every time you have to call that person, you just type that person’s name, and your phone actually calls the number associated with that person’s name. This is precisely why nameservers are called the “phonebook of the internet.”
Now that you know what hosting and domain names are let’s try to understand how to get yourself a domain name and hosting?
Here is my recommendation for the best hosting providers in India:
Hostinger
Click here to sign up using my affiliate link
Click here to sign up using a non-affiliate link
Bluehost
Click here to sign up using my affiliate link
Click here to sign up using a non-affiliate link
NOTE: When you sign up using my affiliate link, I get a commission but you can also choose to sign up using a non-affiliate link, for which I won’t get a commission if you wish to. Regardless, I still feel these are the best WordPress hosting providers in India for good reasons (I will create a separate detailed post explaining why).
Both these companies provide WordPress optimised hosting, and the best part is that with the annual plan, both these hosting companies give you a free domain name for which you would have to pay another Rs. 800 per year otherwise. So, that’s a straight Rs. 800 savings if you go with these guys.
If you are going with Hostinger, I would recommend going with the annual WordPress starter plan, which will cost you Rs. 3243 (get a 7% discount by using the coupon code SANJAYSHENOY). I recommend this plan because you will get a free domain name for a year PLUS a 43% discount with this plan.
If you are going with Bluehost, I recommend that you go with WordPress basic hosting plan, which will cost you Rs. 4233. Like Hostinger, with this plan, you will get a free domain too.
Although Bluehost is more expensive than Hostinger, the premium is justified primarily because WordPress has officially recommended Bluehost since 2005, and they also have local servers in India, which can have a positive impact on the speed and performance of your blog.
Since you will be getting a free domain name from either of these hosting providers, here are a few things to keep in mind.
Things to consider before buying a domain name for your blog

Please note that these are only guidelines intended to help you make the right decision. These are not rules that you HAVE to follow. If you can satisfy all the criteria, then it’s great. If you can’t, at least try to satisfy as many as possible.
Here we go:
- Try to go for a .com domain name
Instinctively people would type your domain name with a .com rather than any other extension like .in or .net. So, it’s best that you go for a .com. Also, it really helps in SEO which can be an important way to get traffic to your blog.
- Keep your domain name under 15 characters.
One could argue that 15 characters are also a lot of characters. Ideally, for a domain name, the lesser the characters, the better but put a hard stop beyond 15 characters. - Keep it simple. Make sure it passes the “phone test”
It can be very tempting to come up with really fancy domain names but resist the temptation. Make sure your domain name is simple and clear to understand and is spelled the same way it sounds. When you say your domain name to another person, like on a phone call, if they ask you to repeat it or spell it out, then you probably need a new domain name, and that’s what the phone test is all about. - Try avoiding numbers
When you use numbers in a domain name, it’s very hard to figure out whether it’s numerical, or you will have to spell out the number (ex: 7 or seven), so it’s best to avoid numbers as much as possible. - Make sure it looks fine when you write it.
Seriously, write it down and see if something looks off. Here are some great examples of domain name fails:
– itscrap.com (IT scrap)
– speedofart.com (speed of art)
– therapistfinder.com(therapist finder)
– expertsexchange.com (experts exchange)
Here’s hoping, you will manage to find a good domain name.
After you are done setting up your hosting and domain registration, you are now ready to set up your WordPress blog. The good news is that Hostinger and Bluehost both come with WordPress pre-installed.
Now, you might be getting confused with domain names, hosting, WordPress. So here is a simple analogy that can help you remember all of these terms. Imagine you are buying a plot of land to build a house. The plot is the hosting provider, the domain name is the address of the plot, and WordPress is like the house’s structure with its foundation, pillars, and walls.
Of course, you cannot live in a house that is just concrete, can you? You need to paint it to not only make it look nice but also liveable. You also need walls and structures inside the house to separate the different rooms. The same applies to your blog. To make your blog more pleasing to your readers, you need a theme.
Suggested reading: 10 Best SEO Courses in Bangalore
How to add a new theme and install plugins in WordPress
A theme comes with a pre-designed layout that allows you to change its appearance, including the layout, typography, color, and other design elements.
Of course, you can’t just have a house that looks pretty; you also need it to be functional, so you add plumbing, electricity, wardrobes, furniture, appliances, and more. In our case, that’s what plugins do – they add functionality to your blog.
To add a theme, log in to your WordPress dashboard. (Usually, the login URL for the WordPress dashboard is yourdomain.com/wp-admin. Of course, replace “yourdomain” with your actual domain.)
When you set up hosting, you will usually be prompted to create a user for your WordPress dashboard and receive an email with the login information.
Once you have logged in, hover over the ‘Appearances’ tab like shown below, and click on ‘Themes’
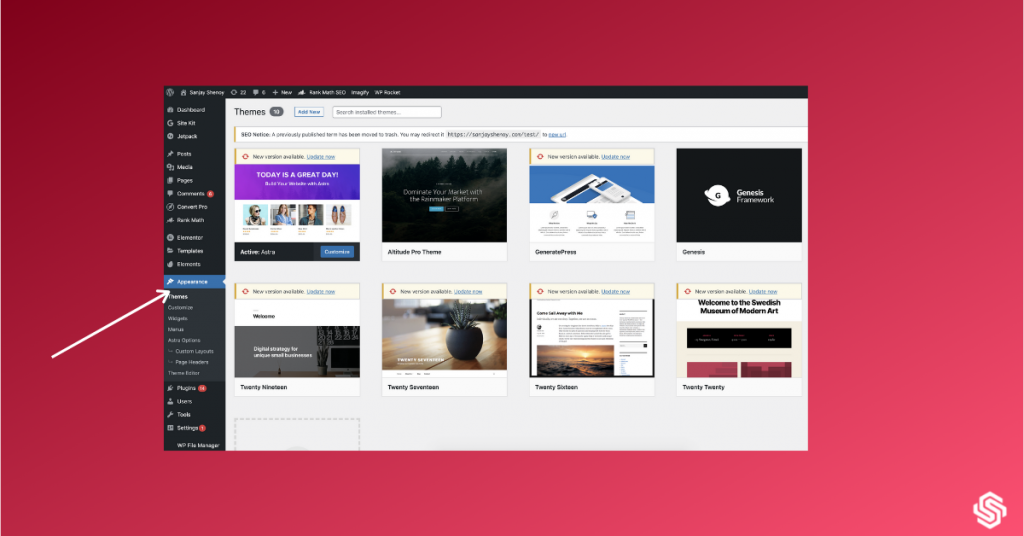
Here, you will find a list of all the available themes for free for your blog. Just hover over any of the themes to either see a demo or install it.
Once you click install, WordPress will install your theme and show you a success message along with ‘Activate’ or ‘Live preview’ buttons. By clicking on the activate button, you would have successfully installed and activated your new theme.
You can also click on the ‘Add New’ button to add a new theme that is available from the marketplace, many of which are available for free, OR click on ‘Upload’ to install your custom theme.
If you are going for a custom theme, I would strongly recommend Astra or Generate Press. Both of these themes have amazing features and make your blog look clean and nice.
How to Install a WordPress Plugin
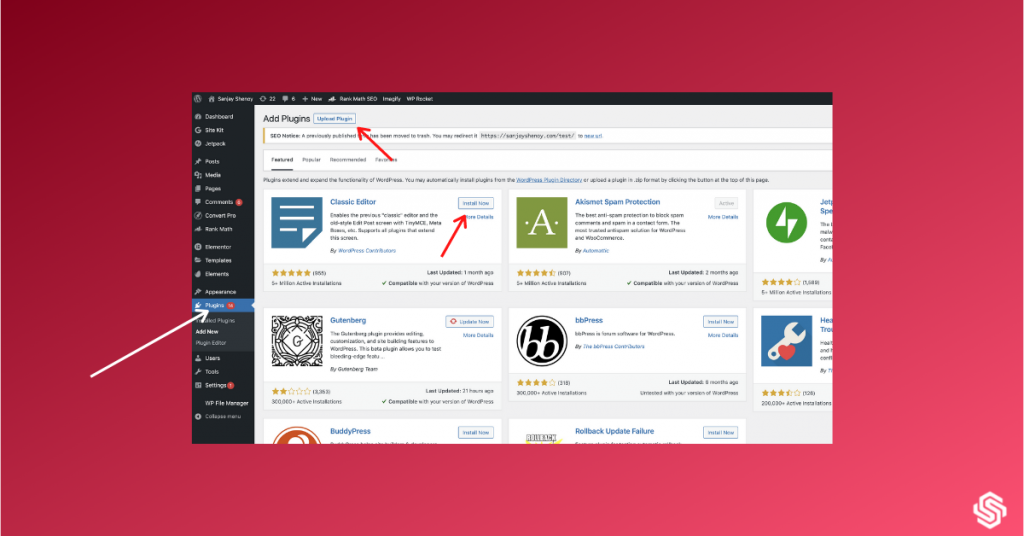
Now, to add plugins, click on ‘Plugins’ in the WordPress admin area.
You might see some pre-installed plugins here, and to install a new one, go ahead and click on the ‘Add new’ button. This will open up a screen with all the Featured, Popular, Recommended, and your Favourite plugins (as shown above).
To install a new plugin, look for a plugin using the search bar and click on ‘Install Now’, which should install your desired plugin. Once installed you will have to activate a plugin by clicking on the ‘Activate’ button.
List of must-have plugins for your newly set up WordPress blog
- Site Kit by Google

This is an official plugin from Google that will allow you to connect your blog to Google services like Search Console, Analytics, Adsense, PageSpeed Insights, Optimize, and Tag Manager. To start off with, just connect your blog with the search console and analytics by following the instructions on the page. Search Console will allow you to understand how your blog is performing in the search engines, whereas Analytics will help you understand how you are acquiring users and their behaviors, among other things.
- RankMath

Yet another essential WordPress plugin that will allow you to optimise your blog for SEO. This free plugin is power-packed and allows you to tweak a lot of things on your entire blog or certain posts on your blog.
- Updraft Plus
Always backup your blog. You never know what can happen to your blog – be it getting hacked, losing certain files, or turning on something you don’t know how to revert. Updraft Plus is the best in business when it comes to backing up your blog, allowing you to set up automatic backups and safely store them on a remote location like Google Drive or Dropbox.
- W3 Total Cache
Your readers are going to be impatient; there is no denying that. Apart from the obvious benefit to the users, having a super-fast blog is crucial to make sure your blog is SEO-friendly. W3 Total Cache allows you to do that for free. Go ahead and install this plugin to make sure you have a high-performance blog.
- Shared Counts

You know what’s better than getting your blog read by your audience? Getting your blog shared by your audience. But they are not going to do it themselves; you have to make it easy for them. Shared counts is a simple plugin that allows you to add clean social media share buttons to your blog.
Like I mentioned before, the WordPress plugins ecosystem is vast, and you can find a plugin to do anything on your WordPress site. Be it setting up an ecommerce site, or a learning management system, or an inbuilt CRM, there is a plugin for it. But, as a beginner, it’s best that you don’t complicate things and keep it simple with these above-mentioned plugins.
Once you are comfortable dealing with the WordPress backend, you can then explore more plugins to increase the functionality of your blog.
Ok, great! You have everything you need for a blog. It’s time to brainstorm content ideas for your blog. Don’t worry, I’ve got you covered.
How to come up with topic ideas for your blog?
If I had to sum up my approach to coming up with content ideas for your blog it would be to give them what they want.
Allow me to explain.
Wouldn’t you agree that the best possible way to attract your audience is to give them what they want first?
I know that you want to share your thoughts, your ideas, and your opinions, but before you do that, you are better off listening to your audience to know what they want and give them that.
But how do you know what your audience wants?
There are a few ways to do that. I will show you all of them, and trust me, simply by following this approach, you will have enough content ideas that will last you a year, if not more.
So, the first step is to ask your friend. But not just any friend, but your best friend – Google.
I am sure, like millions of other people and me, the first thing you do to find any information or solution to a problem is to Google it. Exactly like that, I am sure you will also agree that your audience is doing the same?
To know what your audience is looking for and how many of them are looking for it, the first tool we will be using is called the Ahrefs Keyword Generator. This tool will provide you insights on what kind of queries your audience is putting in the Google search bar, and how many of them (volume) are looking for it every month.
To do that, put in a broad term where you see the phrase ‘Enter Keyword’ and select the country “India” from the drop-down. Click on ‘Find Keywords,’ and it will show you a list like this:
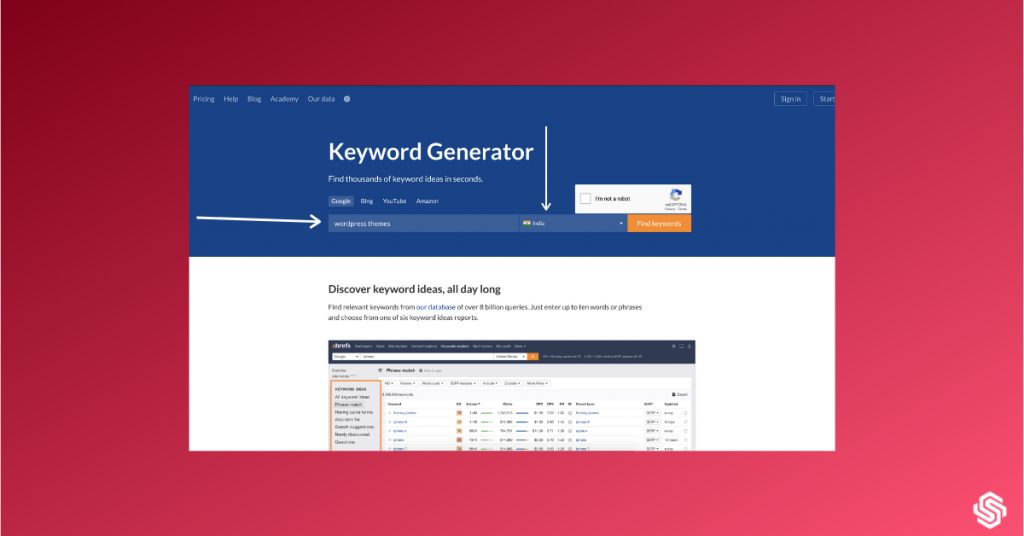
As you can see, this tool shows you all the queries and the search volume (number of people searching every month) for each query. Amazing, isn’t it?
Now, I would strongly recommend that you click on the ‘Questions’ tab to reveal all the questions people have related to your topic. These questions will give you a much clearer idea of what your users are looking for, and it also becomes easier for you to create content around it – after all, as I said, it’s easier to give them what they want and now that you know what they want, just give it to them.
The idea is simple – look for a question that has good search volume and create content around it.
After you have shortlisted your question, I would recommend you to head over to another fantastic tool called Also Asked. This free tool will fetch you all the related questions your audience has around your topic. This will give your blog post depth because you will be able to answer the other questions people have before they even know they need those answers.
Now, I must warn you that you might not get content ideas for all niches with either of these tools because it relies on Google for data. There are some niches for which people do not go to Google, or the demand is simply not that high.
In such situations, I would advise you to tap into the power of Quora.
Quora is a questions and answers site that has a discussion about every topic under the sun and happens to be a great place to gather content ideas and validate them while you are at it.
To do that, head over to Quora and type in your topic in the search bar, which should give you a list of all the different questions people have asked around a particular topic.
But your job here is not just to come up with content ideas but also to validate them. The good news is that Quora shows you the number of views for a particular answer for any question, so in essence, an answer with a lot of views is validation that there is a lot of demand for that question or, should I say, the topic.
To know how many views an answer has received on Quora, click on any of the questions from the search results and you will be able to view all the answers it has received.
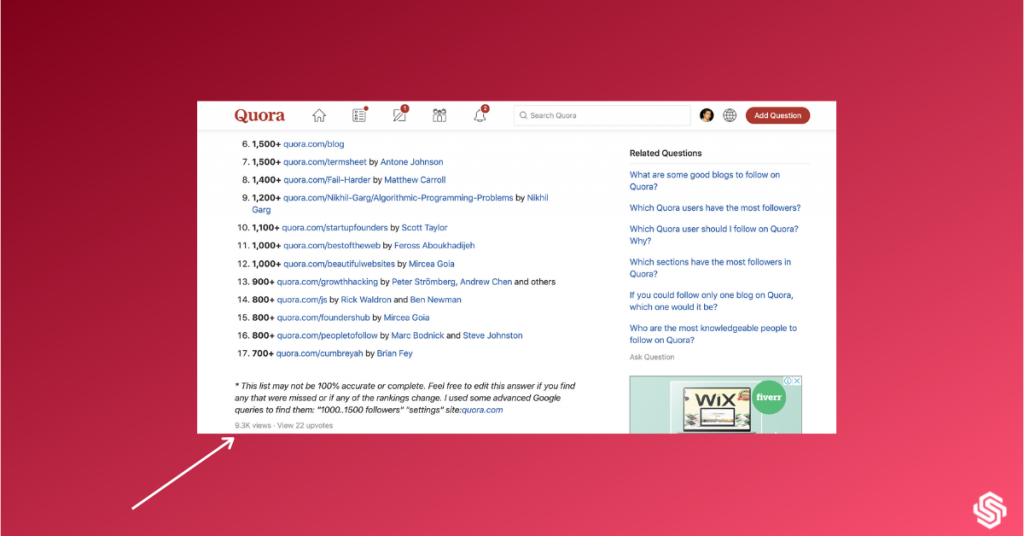
You will notice the number of views an answer has received just below the answer, or you will find a (more) button which, upon clicking, will expand the answer and also reveal the number of views that answer got.
Again, both these approaches will give you enough content ideas to last for a year, if not more. Even if you exhaust all these content ideas, once you start publishing your content, you will start receiving many questions and requests from your audience that you can then loop back into your content calendar.
Awesome! It looks like you have an endless list of content ideas now. But how do you write a blog post around it?
Using my six-step content framework, of course.
Recommended: The Most Definitive Ahrefs Review (+ 5 Unique Ways To Use It)
How to write a great blog post
Now that you have an abundance of ideas for your blog, it’s time to actually get down to it and start writing. I know the thought of writing your first blog post sounds quite daunting, but if you follow a process, it becomes easier, and with practice, you will be writing like a pro in no time at all.
My 6-Step Content Framework should help you articulate, structure, and organise your blog post in a way that the writing process becomes simple and straightforward. The steps are easy, and when you focus on each one, not only will your content add value to your audience, but it will also be effortless to read.
Here’s the six-step content framework:
Step 1 – Headline
A headline has the power to make or break your content.
It is the most important element of your content because the headline is the first interaction your blog post will have with your audience. Unless your headline attracts your audience’s attention, it doesn’t matter how great your content is; your audience will not click.
As the father of advertising David Ogilvy, said, “On an average, five times as many people read the headline as read the body copy. When you have written your headline, you have spent eighty cents out of your dollar.”
What that means is you must spend 80% of your time coming up with a great headline so that your first interaction with your audience is an impressive one and the chances of your content being shared are better.
This is why I insist that you write at least 20 – 25 headlines for each blog post (no, that’s not a typo) so you have options to choose from and get an idea of what kind of headlines work.
Think of your headline as the face of your content. It is what creates the first impression and a lasting impression. Make sure it is a great one.
Step 2 – Introduction
If the job of your headline is to get your audience’s attention, then the job of your introduction is to retain that attention, to make sure they read the entire blog post.
The first paragraph of your content will give your readers an idea of your writing style, the information you’re putting forth, and the content piece’s overall value.
A poorly written introduction can put your reader off. On the other hand, a well-written intro has the power to encourage your reader to read your content piece till the very end. Starting with a compelling story, a question, a statistic, an anecdote can capture your reader’s interest.
Step 3 – The What
“The What” is the first part of the body of your content. It constitutes a major chunk of your content because you are stating the problem that your audience is facing in great detail. Use your words to make them feel the pain of their problem; illustrate it and make them feel the emotion that the problem causes.
It could be physical, mental, or emotional pain, it could be frustration or irritation, it could also be the feeling of lack.
Once you’ve illustrated the problem, it’s now time to share what the solution is. Your solution.
Again, go into as much detail as you can to explain your solution. It’s your solution, so you would know the best way to put it down in words.
Step 4 – The Why
“The Why” is where you explain why your solution is the best.
Let’s face it, there are multiple solutions for every problem, and with Google at our fingertips, looking for them has never been easier. You can bring up other solutions and share your inputs on why they may not work.
Make your case for why what you have to offer is the absolute best and why they must go for your solution instead of other available options. Be sure to include the shortcomings of the other solutions without pointing any fingers because while you want to give your audience an incentive to go for your solution, you don’t want to come across as jealous and petty.
Step 5 – The How
The last part of the body of your content has to be “The How” of the solution you’re offering.
Give your reader the step-by-step implementation for your solution and make things as easy for them as you possibly can. You can turn this portion into a how-to list or a list of steps that explain your system and how it can be followed to achieve their desired result.
Step 6 – Conclusion
Your conclusion decides how your reader responds to your content. Say you’ve written a great piece of content, but your conclusion is shabby, unclear, and doesn’t have a clear call to action, your reader is going to be left with a feeling that the content piece is unfinished.
To avoid this, you must make sure that your conclusion is definitive and ends on a positive note. You can summarise your content, restate the importance of what you’re offering, and why your solution is important and necessary.
Finally, and I cannot emphasise on how important this is – make sure you include a call to action. Tell your reader to take some action.
It could be as simple and straightforward as leaving a comment or as forward as asking them to buy from you. A clear call to action urges your reader to engage with you, and if they’ve made it all the way to the end of your content piece, it is up to you to encourage them to reach out.
And that ladies and gentlemen, is the six-step content framework. It’s a simple and straightforward approach to writing a blog post. Also, I am not sure if you noticed it, but this blog post also uses the framework 😉
In fact, I use this framework to create content in any format, be it videos, Instagram posts, slide decks, and more. The reason this framework works so well is that it’s simple and follows a natural flow.
Go ahead, use it and let me know what you think.
Recommended: 7 Best Books on Writing That Will Inspire You to Write
Things to keep in mind to grow your blog
Now you have everything you need to grow your blog. You have the hosting and domain name set up with WordPress, you have installed your favourite theme and plugins, you have enough content ideas, and you also know how to write a blog post.
It’s time to focus on growth.
Please don’t be of the impression that just because I used the word growth, you have to go in this beast mode trying to churn out as much content as possible. I can guarantee you that you are going to burn out, and worse, blogging will become a chore.
The idea is to get into the flow of writing, and to do that, you have to start small.
Don’t try to write 10 blog posts in a month or an entire blog post in a day. It’s not going to happen. Even if it does, it will not stick.
Having reasonable and achievable goals is the key to growing your blog, even if it means writing just one blog post a month to start off with. If you can do more than that, great! But don’t beat yourself too much in the beginning.
The whole process of blogging should be challenging enough to keep you motivated but not so challenging that it intimidates you.
And here is one final tip before I sign off: you need to allow your content to compound, and the most important thing you need to enable content to compound is time.
You should be willing to do this in the long term for you to see exponential growth with your blog.
So, there you have it. You have one less excuse and everything you need to start your blog.
It’s about time you started your blog now.