I can’t think of a single person who actually enjoys a slow website. Slow websites are annoying, frustrating, and will make users abandon your page, and boy, are they impatient?
According to a survey, if a page takes more than 3 seconds to load, the users will abandon the page. 3 seconds! That’s all the time you have to capture their attention. Additionally, a slow website will significantly decrease your conversion rate.
According to Walmart, for every second increased page speed, they saw a two percent increase in conversion, which can be huge at their volumes.
Apart from that, having great website speeds can be important for the better crawling of your website and, therefore, your SEO. Let’s hear it from the horse’s mouth on this matter:
“Making a site faster improves the users’ experience while also increasing the crawl rate. For Googlebot, a speedy site is a sign of healthy servers, so it can get more content over the same number of connections.” – Google
Not only this, with the page experience update, Google is judge and rank pages based on user experience which will be measured by a new set of metrics called the Core Web Vitals (you will learn more about these metrics later in this post).
But before we understand how to speed up your WordPress site and improve your core web vitals you need to first understand what these are and benchmark your page load speed along with all the other metrics.
There are a couple of tools that you can use to benchmark.
The first one is from Google itself, called PageSpeed Insights. You can also use GTMetrix and for a more detailed result you can use Webpagetest. For the sake of this post, we will be using PageSpeed Insights.
Head over to https://developers.google.com/speed/pagespeed/insights/, and put in any URL from your website that you would like to test.
After a couple of seconds, PageSpeed insights will show you a report with an score on a scale of 100, like this:
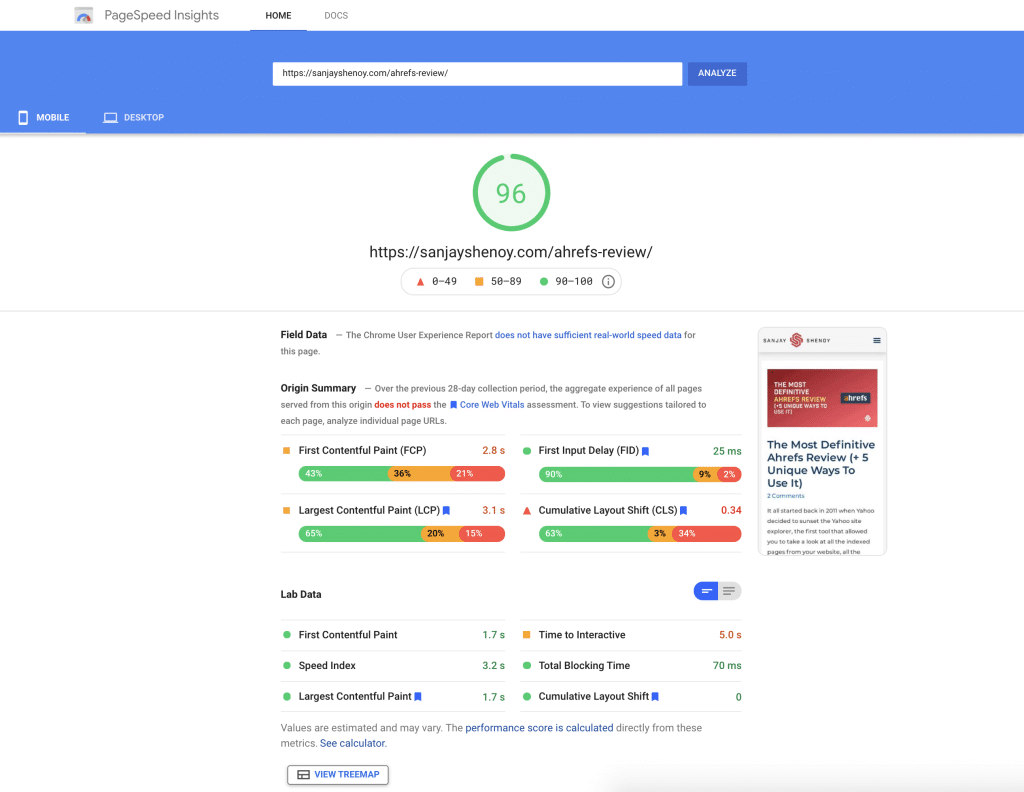
There are different scores for desktop and mobile, which you can toggle in the report. The score you see above is for mobile and is definitely a desirable score. Now, let’s try to understand how to read these scores.
If you notice, there are two different sets of data here: Field Data and Lab Data, along with a bunch of metrics.
Before we dive into the metrics that constitute the report, it’s important to understand the difference between Field Data and Lab Data. It can be confusing to see two wildly different measurements for both. This is because Lab Data is measured under fixed, almost perfect conditions, while the Field Data uses actual loading speeds collected from real users over a 28 day period also known as the Chrome User Experience Report.
Since the Field Data is from actual users, the numbers can vary for many reasons like device type, internet speed, location, browser extensions, and antivirus software used by the users.
Now, since that is out of the way, let’s try to understand the different metrics that are used to calculate the score.
These metrics are divided into core web vitals and non-core web vitals.
The Core Web Vitals are:
- Largest Contentful Paint (LCP)
- First Input Delay (FID)
- Cumulative Layout Shift (CLS)
The Non-Core Web Vitals are:
- First Contentful Paint (FCP)
- Time to Interactive (TTI)
- Total Blocking Time (TBT)
- Speed Index (SI)
You need to understand that these metrics are proxies for user experience and create a good understanding of how users interact with your website.
The core web vitals try to do precisely that. These metrics are trying to measure the loading, interactivity, and visual stability of your page. The reason why I am telling you this is because it is important not to obsess over these scores. Focus on actual user experience but use these metrics to gauge it.
Don’t get caught up with optimising the scores to the point where you have great scores but a crappy user experience.
Let’s now try to understand each of these core web vitals and their respective thresholds:
Core Web Vitals
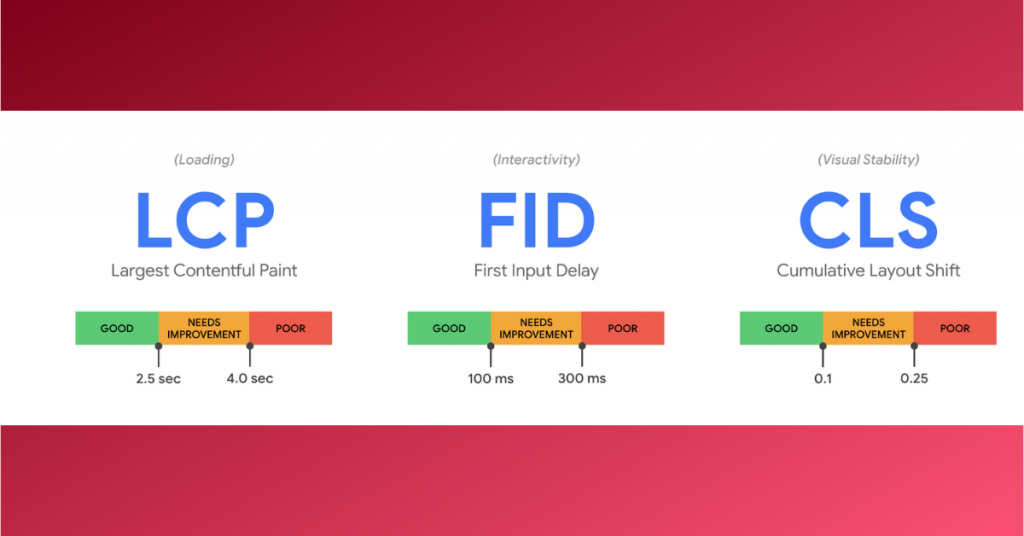
Largest Contentful Paint (LCP): measures loading performance. LCP measures the time in seconds from when the page starts loading to when the largest text block or image element is rendered (or shown) on the screen to the user. For example, the featured image on your WordPress site can be your largest element on a page.
Here are different thresholds for LCP scores:
Good: 2.5 seconds or less
Needs improvement: between 2.5 and 4 seconds
Poor: more than 4 seconds
First Input Delay (FID): measures interactivity. FID measures the time in milliseconds from when a user first interacts with your site (i.e., when they click a link, tap a button, or press a key) to when the browser is able to respond to that interaction.
FID is only available in field data since it needs users to calculate the actual amount of delay real users experience when interacting with your page.
Here are different thresholds for FID scores:
Good: 100 ms or less
Needs improvement: 100 ms to 300 ms
Poor: more than 300 ms
Cumulative Layout Shift (CLS): measures visual stability. It measures the cumulative score of all unexpected layout shifts within the viewport (your laptop or mobile screen) that occur during a page’s entire lifecycle. For example, just when you thought the page has completely loaded, a banner might appear pushing the actual content below. Unlike other metrics, CLS is not measured in seconds, but an easy to remember is that the lower, the better.
Here are different thresholds for CLS scores:
Good: 0.1 or less
Needs improvement: 0.1 to 0.25
Poor: more than 0.25
Similarly, let’s now try to understand the non-core web vitals.
Non-Core Web Vitals
Although these non-core web vitals are not ranking factors in the page experience update, they still impact your PageSpeed Insight scores and also your user experience and therefore may have an indirect impact on your rankings.
First Contentful Paint (FCP): The FCP metric measures the time from when the page starts loading to when any part of the page’s content, like text or images, is rendered on the screen.
Isn’t it annoying when you try to access a site, and you don’t know whether anything is happening or not? FCP is to measure exactly that, and therefore having a fast FCP reassures users that something is happening and not abandon your site.
Here are different thresholds for FCP scores:
Good: 1 sec or less
Needs improvement: 1 sec to 3 sec
Poor: more than 3 seconds
Time to Interactive (TTI): TTI measures how long it takes a page to become fully interactive. For it to be fully interactive, it needs to display useful content (measured by FCP), have the most visible page elements rendered, and respond to user interactions within 50 ms.
Unlike FID, TTI measures how long it takes your page to be ready for interaction and does not need users to calculate.
Here are different thresholds for TTI scores:
Good: Less than 3.8 seconds
Needs improvement: 3.9 to 7.3 seconds
Poor: more than 7.3 seconds
Total Blocking Time (TBT): TBT measures the total time in milliseconds between First Contentful Paint (FCP) and Time To Interactive (TTI).
TBT measures the total amount of time that a page is blocked from responding to user input, such as mouse clicks, screen taps, or keyboard presses.
TBT highly correlates with First Input Delay (FID) and is therefore considered the best alternative when testing in a lab environment where real user interaction isn’t possible.
While TBT can be gathered in the field, it’s easily influenced by user interaction and doesn’t make for a reliable metric to measure how long it takes for a page to become responsive to user input. Therefore, TBT is only used in lab data.
Here are different thresholds for TBT scores:
Good: Less than 300 ms
Needs improvement: 300 ms to 600 ms
Poor: more than 600 ms
Speed Index (SI): Speed Index measures how quickly content is visually displayed during page load. To do this, Lighthouse first captures a video of the page loading in the browser and calculated using frame-by-frame analysis of your page’s load behavior, counting the visual progression between frames captured every 100ms.
Here are different thresholds for SI scores:
Good: Less than 4.3 seconds
Needs improvement: 4.3 to 5.8 seconds
Poor: more than 5.8 seconds.
Now, to get the performance score on a scale of 100, the weighted average of all the above-mentioned metrics (both core and non-core) is considered. Here is a breakdown of all metrics and their respective
Here is a great visual representation of all these metrics and how they happen:
Along with these, here are some of the common recommendations on PageSpeed Insights that you might come across:
| Eliminate Render-Blocking Resources |
| Avoid Chaining Critical Requests |
| Keep Request Counts Low and Transfer Sizes Small |
| Minify CSS |
| Minify JavaScript |
| Remove Unused CSS |
| Minimize Main-Thread Work |
| Reduce JavaScript Execution Time |
| Reduce Server Response Times (TTFB) |
| Properly Size Images |
| Defer Offscreen Images |
| Efficiently Encode Images |
| Serve Image in Next-Gen Formats |
| Ensure Text Remains Visible During Webfont Load |
| Enable Text Compression |
| Preconnect to Required Origins |
| Preload Key Requests |
| Serve Static Assets With an Efficient Cache Policy |
| Reduce the Impact of Third-Party Code |
| Avoid Enormous Network Payloads |
| Avoid an Excessive Document Object Model (DOM) Size |
As mentioned before, speed optimisation is a never ending slippery slope.
Before I jump into helping you understand how to optimize and improve these metrics, let me give you a fair warning again not to get obsessed with improving these scores. As mentioned before, these metrics are proxies to understand user experience on a page, and that’s what your focus should be on: user experience.
Since user experience is subjective and depends on various factors that are beyond your control, these metrics are used to measure user experience objectively, but at no point should these metrics be used as a replacement for actual user experience.
The concept of User Experience Optimisation (UXO) doesn’t hold more validity than it does in this aspect of SEO. It’s crucial to make sure that, in the quest to improve your PageSpeed insights scores, you end up compromising on actual user experience.
Having said that, let’s now jump into understanding how to optimise your WordPress website and which metrics are affected by the changes we will be doing.
WordPress Speed Optimisation – How to Speed up Your WordPress Site
A fair disclaimer is needed here before we proceed. Everything mentioned in this segment pertains to optimising your WordPress website. But everything mentioned below can and should be implemented on regular websites too. It’s just that it will be a tad bit difficult to do on traditional websites, considering you don’t have plugins to help you and rely on your tech team.
Get the wrench because we will be getting under the hood of your WordPress website to make a few changes. Here is everything you need to make your website load super fast.
Step 1: Choose a good hosting company

A hosting server is nothing but a computer connected to the internet where all your website files are stored. Every time you need to access these files, you need to type in your website address in your browser to access them.
Since you are relying on another computer connected to a network that you do not control, you have to make sure that your hosting servers are of great quality, but what does that mean?
When you go hosting shopping, you will notice that many hosting companies offer to host in three different ways: shared hosting, virtual private server (VPS), or dedicated hosting.
As the name suggests, you will be sharing the space on your host computer with other websites in shared hosting. This might lead to overcrowding of the servers, which can impact the performance of your site. Also, if one of the sites has an issue, that can very well cascade into your website too. Think of it like running multiple software on your computer; your computer will eventually give up, and none of the applications will be able to run or even respond.
Similarly, when there are too many website files on a single server, it tends to slow it down, but the benefit of shared hosting is that it’s the cheapest option you have for hosting. Popular shared hosting platforms are Bluehost, Hostinger, and Siteground.
Virtual Private Server (VPS) is hosting that virtually mimics dedicated server environments within a shared server by using isolated instances on the same server to provide dedicated (private) resources to these virtual servers.
Although slightly more expensive than shared hosting, with a VPS, you are not exposed to the shortcomings of other websites because your website will be isolated from the rest of the websites. Also, unlike shared hosting, where you might have as many as 200 websites on each server, you will have much fewer websites on each server on a VPS.
But if you want exclusive access and usage to the entire server, you should be doing for dedicated servers where you will not have any other website except yours.
Since we are talking about WordPress, managed WordPress hosting is worth mentioning here because these servers are typically tailored to work with WordPress and provide better performance.
Although you won’t be getting dedicated hosting space on these hosting platforms, the speed is incredible thanks to setting up the servers to host WordPress sites exclusively. Some of the best managed WordPress hosting companies are WPX, Kinsta, and Hostinger.
Remember, the host server is nothing more than a computer connected to the internet? I am sure you would agree that the closer this server is, the faster you will be able to access your website files.
And that’s exactly why you need to choose a hosting provider that has local data centers or has data centers close to where you and your users are located. A data center is nothing but a physical location where all the servers are placed.
Usually, most hosting providers will have multiple data centers, and you can choose which data center you want to host your website at. For example, Kinsta has 25 centers spread across the world, whereas WPX has 3 data centers.
The distance between your location (or your users) and the website affects the speed at which your website loads. An easy way to measure this objectively is using a metric called Time to First Byte (TTFB). In other words, TTFB is the time the browser has to wait to receive the first byte of data from the server. The longer it takes to get that first byte of data, the longer it takes to display your website to you or your users, and also reduces your server response time for your WordPress site.
Apart from choosing hosting providers that are closer, you can also choose hosting providers that use the HTTP/2 protocol vs. HTTP. What does this mean?
HTTP is the method computers, and servers use to request and send information. For instance, when someone navigates to sanjayshenoy.com on their browser, their web browser sends an HTTP request to my servers. Then, my server sends HTTP responses with the text, images, and formatting that the browser displays to the user. This is why you have an http in front of your website address.
This was the protocol used by most servers until 2015, when HTTP/2 came along, which was faster and more efficient. One of the reasons HTTP/2 is faster is because of the way it loads content.
In HTTP, your files get loaded sequentially, meaning one file needs to be loaded before the next one starts loading. On the other hand, in HTTP/2 the files can load concurrently, meaning multiple files can begin loading parallelly, making the entire loading process faster and more efficient.
Most managed WordPress hosting providers deploy an HTTP/2 protocol, but you can always use this tool to check whether your host is using HTTP/2 or not: https://tools.keycdn.com/http2-test
Although you might find a hosting company that deploys HTTP/2, it might be much more difficult for you to find hosting providers that are affordable with local data centers. So, what’s the solution?
Step 2: Use a Content Distribution Network (CDN)
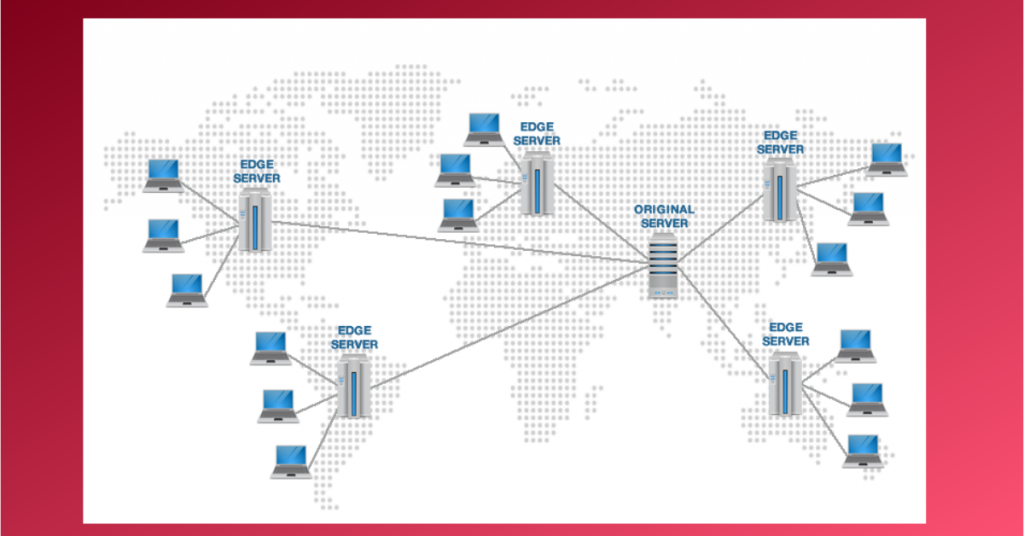
Since most hosting providers can’t provide multiple data centers, they deploy something called Content Distribution Networks or CDN. A CDN is a network of servers located worldwide that host and delivers copies of your website.
Does that mean you don’t need a web host at all? No, you definitely still need a hosting provider because a CDN is just a content delivery network meaning all your static content (or content that does not get changed often) like images, CSS etc. will be loaded from the nearest CDN server, and rest like your website’s database etc. will still be loaded from the main host server.
A CDN supplements the host server and makes the entire process efficient and also more secure. By deploying a CDN, you can dramatically reduce your TTFB ( Time to First Byte) and, therefore, your total load time.
A simple yet effective and free CDN that you can deploy on your website is Cloudflare. Apart from improving your website speed, Cloudflare also provides a free DNS service which is as good as premium DNS services like AmazonRoute 53.
When you type in a website address in your browser, the nameservers need to lookup DNS records and direct traffic to your host, and this takes time, although it’s just a matter of milliseconds. By using Cloudflare, you can make your DNS blazing fast for free! It will also help you in solving the “Reduce DNS Lookups” issue.
If you are going for premium managed WordPress hosting like WPX or Kinsta, they have their own premium CDNs, which are included in their plans so that you don’t have to purchase an additional CDN service. If you still want to go for premium CDN, then MaxCDN is a great option.
Step 3: Choose a good theme

All that glitters is not gold, and the same can be said about WordPress themes. While there are thousands of themes available for WordPress, having a lot of choices is not exactly a good thing, especially when you have to consider performance. Just because a theme looks good and has loaded features doesn’t necessarily mean it’s suitable for your WordPress website.
Ideally, a good WordPress theme should have the following characteristics:
- Lightweight (in terms of size and code)
- Ability to enable and disable features
- Clean interface for the users
I believe Astra WordPress theme takes the prize for being super lightweight, has a ton of features that you can disable if you don’t want to use, and is clean and elegant. Another great theme that you can go for is GeneratePress.
Both Astra and GeneratePress provide free and premium versions, so if at any point you feel like upgrading, you can do so without missing a beat. ( I use Astra Pro for my blog, and it is absolutely amazing)
If you want to design your own page (like your homepage), you can use Elementor with Astra Pro, which is considered to be one of the best page builders out there in the market.
But, mind you, if you choose to use Elementor, it might affect your page speeds because of all the added elements that it has to load. Of course, the native Gutenberg Editor in WordPress is kicking quite a storm in the WordPress development space, considering how effective it can be to design and develop your pages with it.
Regardless, both these page builders have been developed keeping speed and performance in mind. But if you choose to design your pages with them, make sure you test your speeds before and after adding them to know and understand how it is affecting your page speeds.
Step 4: Use the right plugins
Exactly like themes, you must keep an eye on your plugins too. It’s not about the number of plugins you use but the quality of plugins you will be using. Also, if a plugin is not developed properly, it can increase the vulnerability of your website, making it more susceptible to hacking.
This doesn’t mean that you demonise all the plugins available in the market. In fact, you need plugins to enhance the functionality and more importantly, in this case, increase the performance of your website.
And to do that, one of the best plugins out there in the market is WP Rocket. There are other free alternatives in the market (like W3 total cache), but nothing comes close to WP Rocket in terms of performance.
The best part about this plugin is that when you install and activate the plugin, the plugin will automatically apply 80% of web performance best practices without touching anything. You will see an improvement in the loading time just with the default configuration.
Before we dive into understanding how exactly WP Rocket does this, let’s try to first understand what caching is, which is an important element in making your WordPress blogs and websites load faster.
As you might already know by now, every time a visitor visits your website, their browser sends a request to your server, which then processes the request, and the resulting web page to be shown is turned into an HTML file and sent to the visitor’s web browser.
This is where caching comes into play. Caching enables the servers to store copies of the HTML file in a temporary storage location in order to access them faster. In other words, the server doesn’t need to do the processing and conversion to HTML. Instead, it simply sends the already prepared HTML file to the browser.
This reduces the work required by the server to load the page and therefore makes the loading faster. You will notice your Time To First Byte (TTFB) will dramatically reduce and improve first contentful paint after you enable caching.
(Note: Some hosting companies take care of page caching automatically)
WP Rocket also automatically enables browser caching. What this does is that it will enable browsers to cache most of the content that appears on the web page, saving a copy of the web page’s content on your device’s hard drive. This way, the next time you load the page, most of the content is already stored locally, and the page will load much more quickly.
This setting should take care of browser caching warnings that you might see when you do your PageSpeed Insights test. This speeds up website loading for visitors who view more than one page or visit more than once.
WP Rocket also automatically enables GZIP compression. This reduces the size of your files, making them faster to download.
These settings are safe and, in fact, recommended to make your website load faster. But apart from this, WP Rocket also gives you a bunch of other settings that you can play around with to make your site even faster.
Let’s understand each of these settings and what they do. But before you go trigger happy with these settings, please understand that just because you have these options doesn’t mean you HAVE to turn them on, and by turning them on, they won’t necessarily make your website faster. The best way to ensure that you have the best settings is to enable each setting and see how it affects your performance before deciding whether to leave it on or not.
How to properly set up WP Rocket
Cache
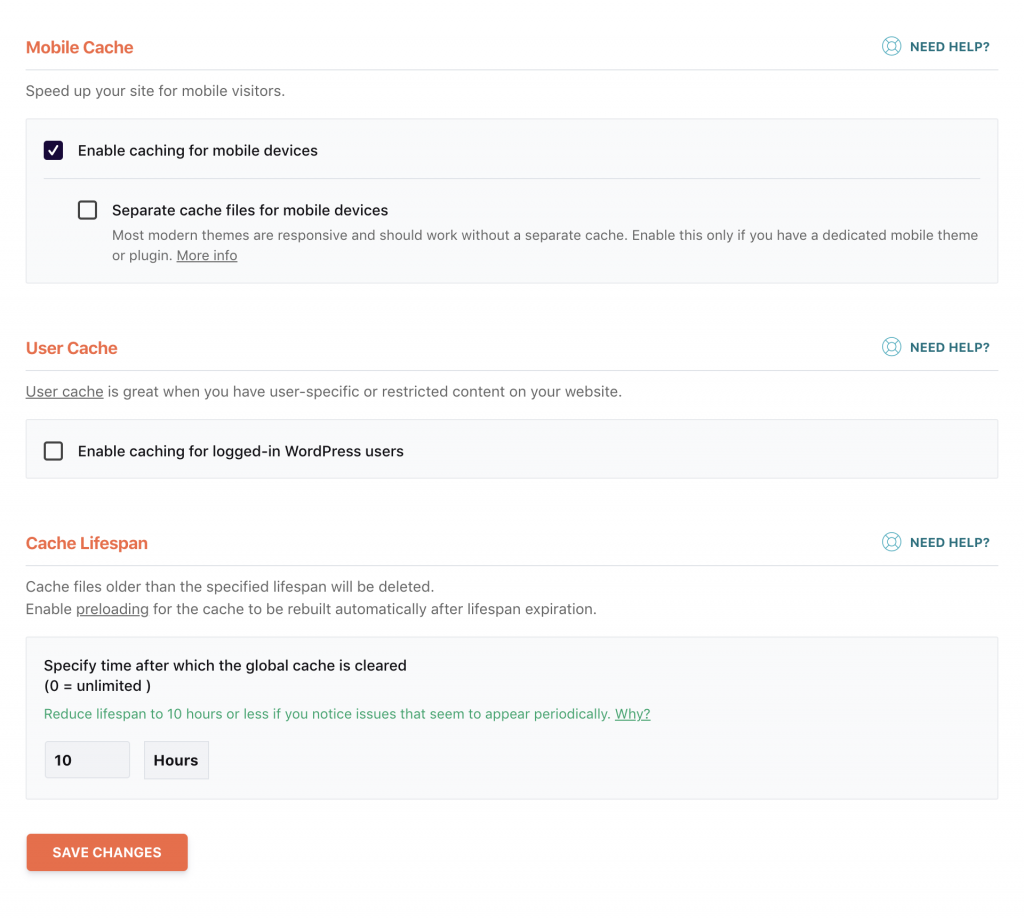
Enable caching for mobile devices: Enable this. It works exactly the same as it does for desktops, except it also does the same for mobile devices. Considering more than 50% of your visitors will be from mobile, enabling this would definitely help.
Separate cache files for mobile devices: Enable this ONLY if you have a separate mobile site. If your theme is responsive (which should be in most cases), leave it disabled.
User Cache: Enable this if you have a website that requires users to log in to view data (like a membership site). If not, leave it disabled.
Cache Lifespan: This signifies how long the cache will stay till it’s deleted and replaced. Leave this at 10 hours, and we will need to enable cache preloading to replenish the cache. We will do this later.
File Optimisation
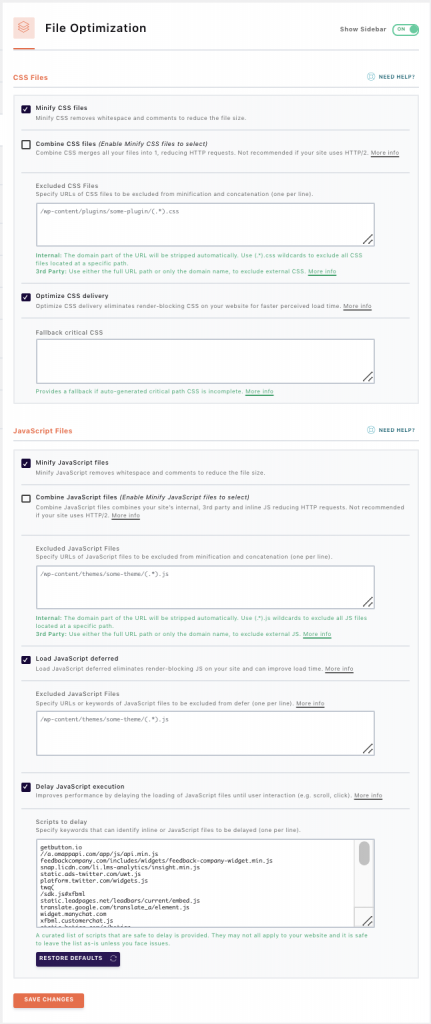
Minify CSS: Enabling this will remove the white spaces in the CSS files and therefore reduce the file size, making it faster to load. Enable this.
Combine CSS files: Enable this ONLY if your hosting does NOT have HTTP/2. As explained before, HTTP/2 will load files in parallel, so this setting won’t make sense and can do more harm than good.
Optimize CSS delivery: This option fixes the PageSpeed recommendation: “Eliminate render-blocking resources.” It does this by eliminating render-blocking CSS on your website for faster-perceived load time. Enable this.
Minify Javascript files: As discussed above, this too will remove whitespaces in your Javascript files and reduce the file size. Enable this.
Combine Javascript files: You guessed it right. Leave it disabled if your host uses HTTP/2.
(Note: You might want to play around with toggling “Combine CSS files” and “Combine Javascript file” to solve the “avoid chaining critical requests” issue on WordPress)
Load Javascript deferred: It is recommended that JavaScript files are either loaded in the footer of your site or deferred so that they don’t block the downloading of other assets on your site, thereby slowing it down. Enable this to fix the “Eliminate render-blocking resources” issue in PageSpeed.
Delay Javascript execution: Enable this to delay the loading of all JavaScript files until there is a user interaction (like scroll or click). It will fix the following in PageSpeed:
- Remove unused JavaScript
- Minimize Main thread work
- Reduce JavaScript Execution time
- Total blocking time
- Time to Interactive
- First contentful paint
Media
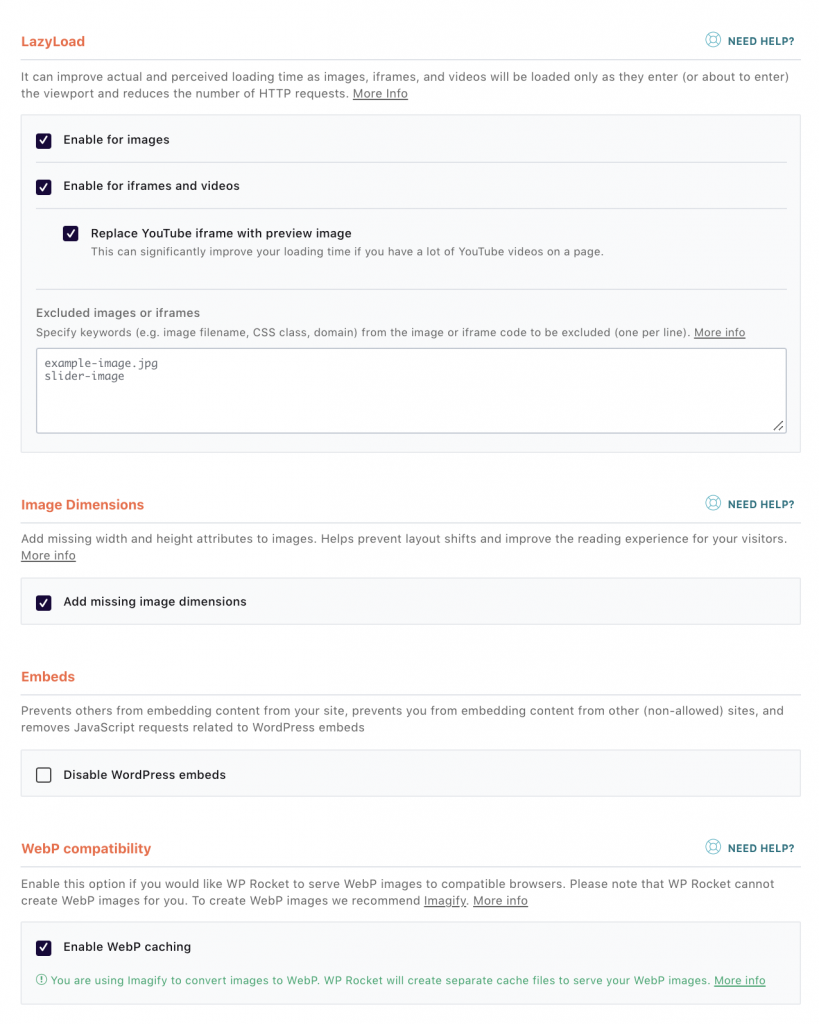
LazyLoad: This option delays the loading of images on your website until the user scrolls down the page and actually needs to see them, thereby reducing the number of HTTP requests and improving actual and perceived loading time. Enable all the following settings:
- Enable for images
- Enable for iframes
- Replace YouTube iframe with a preview image (useful when you embed videos)
Image dimensions: This feature adds missing height and width attributes for your images, improving your Cumulative Layout Shift (CLS). Enable this.
Embeds: Enabling this will prevent others from embedding content from your site but also prevents you from embedding from other sites. Don’t enable this.
WebP Compatibility: WebP is a modern image format (like Jpg or PNG) that compresses your images without compromising the images’ quality. I would recommend enabling this, but if you choose to do this, you will have to install another plugin (like Imagify) to convert your existing images on your website to WebP.
Preload

Activate Preloading: When you activate preloading, every time your cache is purged or after the cache lifespan is done, WP rocket will automatically generate the cache starting with the links on your homepage followed by the sitemaps you specify.
Let us enable this and also enable “Activate sitemap-based cache preloading,” which will reveal another option, in my case, RankMath XML sitemap, which is automatically detected by WP Rocket. Enable this option, or you can specify your sitemaps in the box given below.
Preload links: Activating this option will improve the perceived load time by preloading any link on your site when the user hovers over it for 100ms or more. When the user hovers over the link (and does not click on it), the HTML will be fetched in the background so that when they actually click the link, the page will appear to load instantly. Please note that, by activating this option, your PageSpeed scores will not see any impact, but it will definitely improve user experience, which is why I would recommend enabling this option.
Prefetch DNS Requests: If you have a lot of third-party content like Google fonts or YouTube videos, add the source domain (eg: youtube.com) in the box given below. By doing so, you might be able to solve the “Reduce DNS lookups” recommendation. Since I am not using any third-party content, I will be leaving this empty, but if you see this recommendation, I would recommend adding the origin domains in the box without the http or https.
Preload Fonts: Please use this option only if you see this under Opportunity in PageSpeed Insights “Preload Key Requests.” Also, this option will be automatically disabled when Optimize CSS Delivery is activated.
Since your fonts are referenced from within a CSS file and wouldn’t be discovered until much later, this option will tell the browser to start downloading fonts much faster and therefore improve load time.
Advanced Rules
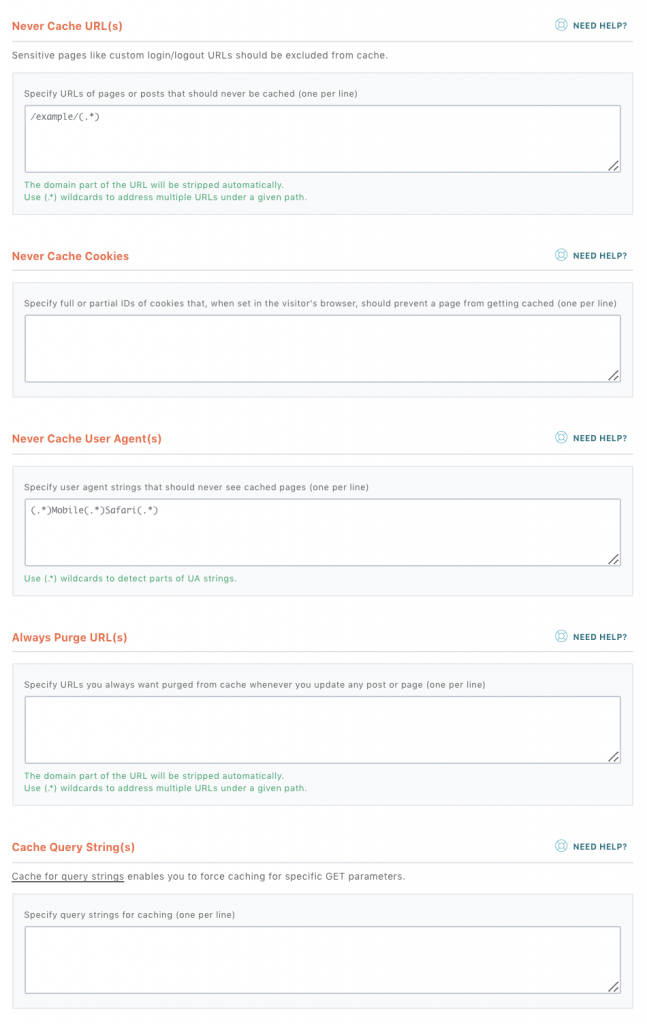
Fair disclaimer: Most of the options you have, as the name suggests, are for advanced and rare use cases. In most cases, you may not have to change anything here. Regardless, I would like to tell you what each of these options does so that you are in a better position to make the right decision.
Never Cache URLs: You can use this option to exclude sensitive pages like your login URLs. You can also use simple Regex (*) to exclude a group of pages at once. But please be careful while using either of these options, as you might end up excluding some important pages too.
Never Cache Cookies: This option prevents cached pages from being served once a specific cookie is set in the browser. For example, if you have an eCommerce site set up, and your user adds a product to the cart, a cookie is set by the eCommerce plugin (like woocommerce). You can specify not to cache these cookies with this option to prevent them from displaying the wrong information in the cart.
Never Cache User-Agent: If you want to prevent cached pages from being served on certain devices and browsers, you can use this option. For example, if you want to prevent iPhone + Safari users, you can use something like Mobile(.*)Safari(.*).
Always Purge URLs: Every time you update a post, WPRocket partially clears the cache, but sometimes you might notice that related content is not getting updated like on the home page, where your blog posts appear, use this option.
Cache Query Strings: A query string is where you have a URL that contains a question mark followed by a parameter and a value, like this: example.com/?id=532. If, for any reason, you want to cache these pages, use this option.
Database
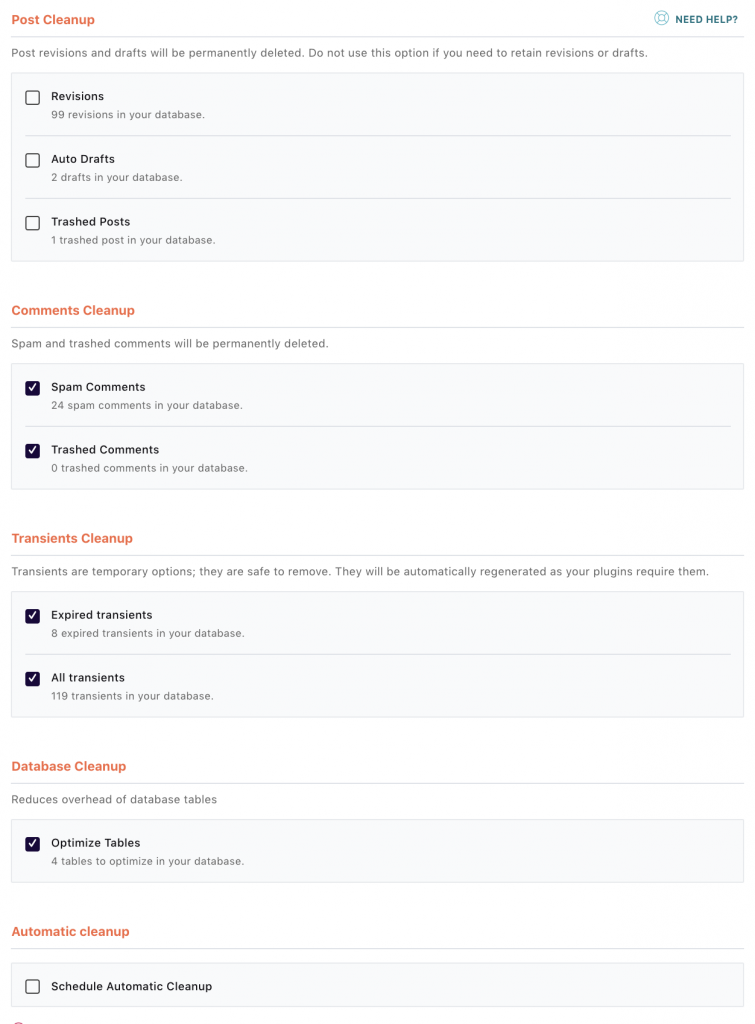
Heads up! Please backup your database before you use any of these options because once the database optimisation is performed, there is no undoing it. You can use a plugin called Updraft plus to do this.
Post cleanup: Every time you update a post, the older versions will be retained by WordPress by default, or you might have a lot of posts in drafts. All of these may bloat up your database, so using this option can help you clean it up. But please note that if you clean it up, all your revisions and draft will be deleted!
Comments cleanup: Anyone running a half-decent and successful blog will know how difficult it is to manage spam comments. Again, these spam comments and the comments you have trashed will be deleted when you enable this option.
Transients cleanup: Transients are a type of temporary data cache that your plugins need. It’s safe to remove these but just make sure it doesn’t go down to zero. Your plugins will automatically regenerate them as your plugins require them.
Database cleanup: A cleaner database can make your website and admin area faster. By optimising your tables, you are reducing the overhead of database tables and making them efficient.
Automatic cleanup: Schedule automatic cleanups with this but like mentioned before, make sure you have automatic backups also.
CDN
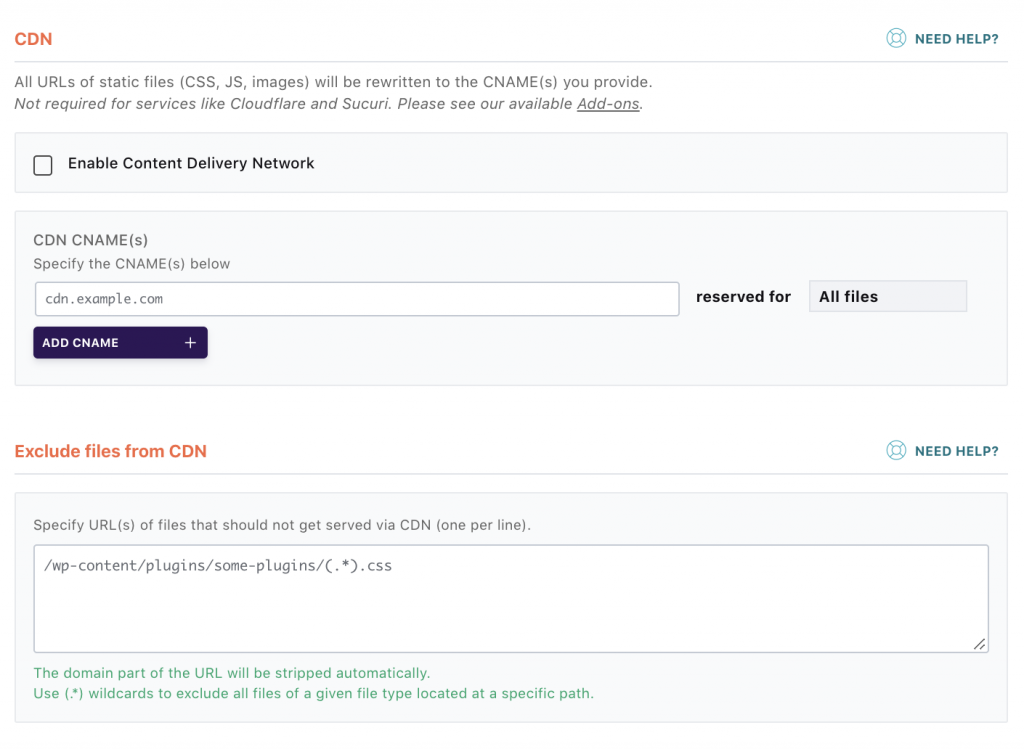
You know what a CDN is, so if you are using one, make sure you add it here, but if you are using Cloudflare or Sucuri, it’s not required to update this option. You can also exclude certain files (like plugins) from the CDN in the option given below.
Heartbeat
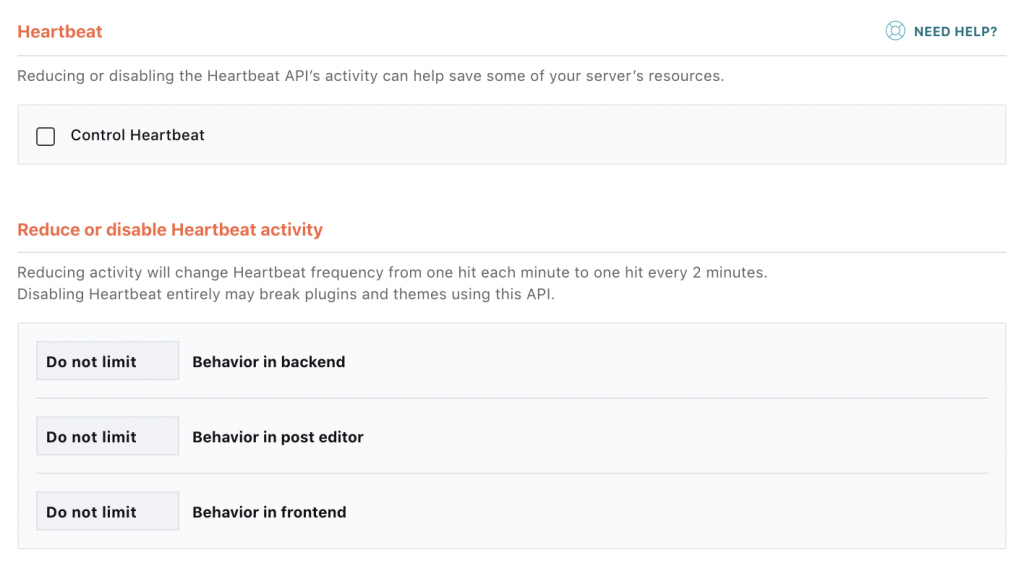
The Heartbeat API in WordPress allows your browser to communicate with the server when you’re logged into the WordPress admin panel. This allows WordPress to handle things like showing other authors that a post is being edited by another user and more.
Reducing or disabling the Heartbeat API’s activity may help your server save some resources, but it may also break plugins and themes using this API. It’s best if you leave it alone if you don’t know which of your plugins and theme is using this option.
Add-ons
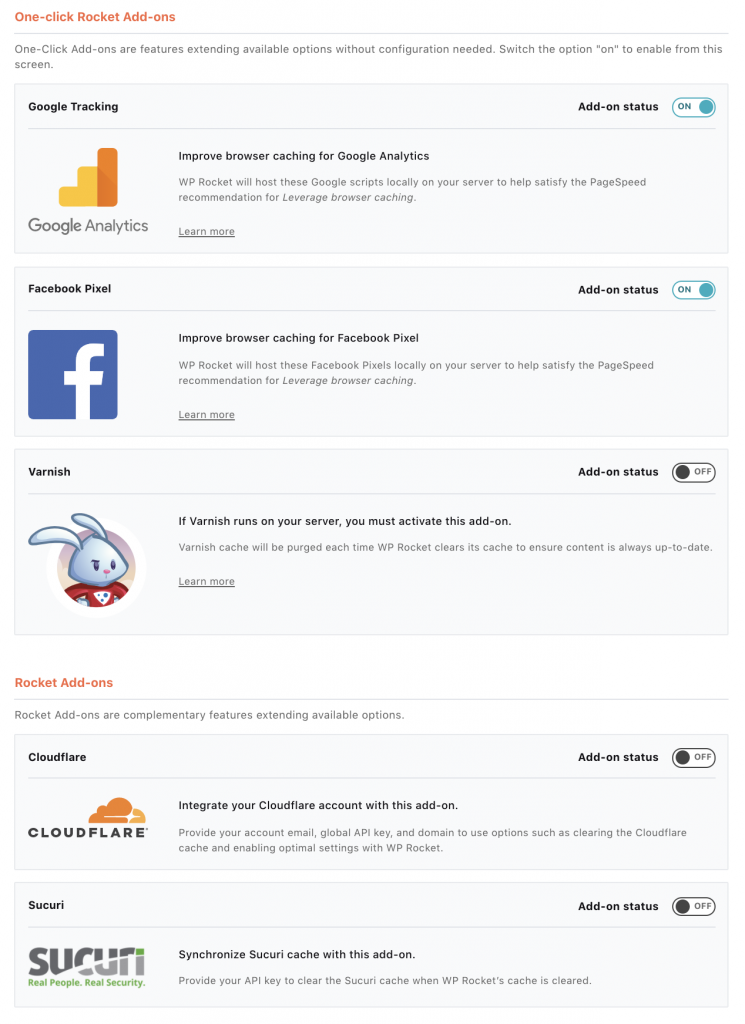
You can enable certain addons here without any configuration needed.
Google Tracking: I would recommend enabling it because when you enable it, WP Rocket will host these Google scripts locally on your servers which will solve your leverage browser caching issues in PageSpeed recommendations.
Facebook Pixel: Same as above, and I would recommend enabling it.
Varnish: First, check with your hosting provider if Varnish runs on your server and if it does enable this feature.
Conclusion
That’s it! All these changes should make it possible to dramatically improve your page loading speeds and also user experience.
You can get sucked into this black hole without you realising it, and you might end up losing your mind. Trust me, I have been there and have come back to warn you.
You might find yourself obsessing over PageSpeed insights’ metrics, which again is a futile exercise because honestly, your users don’t care whether you have the elusive 100/100 score.
All they care about is how smooth the experience is for them so please focus on the users, and the ultimate speed test is how your users are experiencing the speed.
Are there any other tips that you would like me to include? Let me know in the comments below.